| |||||
|
The Gourd Report Smaller gourds will dry in a day or two, larger gourds may take a few days of 12-18 hours per day, but they will be ready to craft in a very short time, later in the book we will explain how to use this method to get your gourd from the vine to the crafting table in 3 days or less. You will know when the gourd is dry, by hitting it into your hand to break the seed pack loose on the inside, once you hear the seeds rattle around, you know it is ready. The inside of the gourd is cleaned the same way as mentioned earlier in the dry cleaning portion of this booklet.
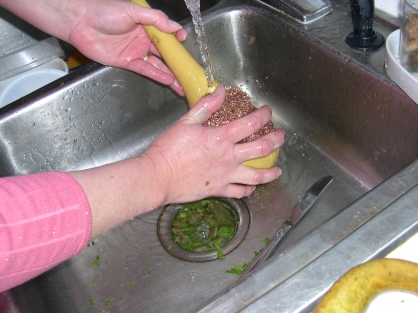
Fig 5 - Using a Chore Boy copper scrubber with light pressure to remove any skin remnants missed by the flat backside of the table knife. This insures a smooth even finish when the gourd is dry.
The Gourd Report
Vol 1. - Drying Gourds
ROTTING YOUR GOURD:
The Third method of cleaning a gourd is called rotting, and it is literally that. The shell and the seeds will not rot in this process, but the skin of the gourd as well as EVERYTHING attached to the inside of the gourd will rot, and rinse right off with no more than a little rubbing with your hands. The advantage to rotting a gourd are multiple, it cleans the inside of the gourd as well as the outside of the gourd, the final product will be a nice, light colored shell, without the mold markings, again great for Pyrography and light artwork, and last but not least, it is absolutely dust free!! The down side is, it is not odor free, and it takes a few weeks to complete the process.
Fig 6 - In this image, we have removed the top of a Kettle, with a cut that conforms to our crafting plans for this gourd. This will be
placed in this 5 gallon bucket for 3 weeks, then repeated 2 more times between wiping and rinsing.
The Gourd Report
Vol 1. - Drying Gourds
The method of rotting depends on the size of the gourd, we’ll talk about smaller gourds first. To rot a gourd, you must decide what you are
going to do with the gourd, a bottle, a bowl or a box, because you must drill a hole or cut the gourd in order to rot the inside of the gourd
along with the skin. If you are making a bottle or canteen, drill a hole large enough for the seeds to rinse out of the gourd, the size of
the seeds depends on the size of the gourd. Our 3 pound Hyakunari’s require about a 3/8 inch hole, a canteen may require a ½ inch hole,
however if you are going to make a larger hole in it later, go ahead and drill the larger hole now, as it will make cleaning the inside much
easier. We make trinket boxes out of most, so I simply cut my gourds in half for the process.
Once your gourds are cut, us a coat hanger to puncture the white vegetable matter on the inside to allow the water to penetrate into the gourd, then they must be fully submerged in water for 2 to 3 weeks. The process is called rotting because it does rot, and as you would imagine, it creates a nasty odor, very similar to a septic tank. Because of this, as well as the risk of mosquito’s in the late summer early fall, we use 5 gallon buckets, and put the lid on tight. Do not place the bucket in direct sunlight, or where it will get very hot, as it could cause the lid to blow off releasing it’s pungent odor, though we’ve not lost a lid yet. During the first rotting of the gourd, do NOT change the water.... The whole purpose is to allow bacteria to culture within the water which will actually eat and decay the skin and the vegetable gel on the inside of the gourd. I always wait 3 weeks, then I am ready for the first rinsing. Please do yourself a favor, and invest in a box of rubber examination gloves, and wear them while cleaning.
| ||
Gourds>Educational>The Gourd Report 1
|
Gourds TGR Associate Store Educational YouTube Videos Galleries Products Web Hosting Electronic Sales TGR Shopping Mall Shop by category
Website updated in whole or in part daily
© 2003 The Gourd Reserve ™
Daily Sales Online / Everything Makes Scents / The Joy of Hope Foundation / Music and the Arts / Carmellas Place / Danos Place / Family Friendly Forums / The Dunkin Academy
Web Design by Dan Dunkin


